¶ Milking
All cheese production starts with milk from a dairy animal. Milk production drops over time, more so when milking is not done regularly, so it's important to milk your dairy animals at least once per day during their main lactation. The right techniques and technology can make this daily chore less arduous and more rewarding. The two methods of milking are by hand (manual milking), or by machine, each with its own advantages and disadvantages. For commercial production, most governments require machine milking in an attempt to improve cleanliness, although hand-milking can be done in a clean manner as well with some attention and thought paid to the process.
Animals, like human mothers, first need to “let down” in order for the milk to begin flowing. This can take some time, and is best encouraged by a regular routine, a safe and clean environment, and anything else that can reduce stress. Once the milk has let down, it is important to express as much milk as possible to help production stay high, and to avoid potential infection (mastitis).
Many dairies will milk their animals twice per day (and bottle feed the calves/kids/etc), but some dairies will engage in e.g. calf sharing where the calf or kid or lamb gets to be with its mother during the day, but at night is penned up separately and the morning milk goes to the farmer. For a dairy cow producing for just a farmer's family, this arrangement can help manage the sheer amount of milk a high-producing breed can give, but it often means less milk available for making cheese, yogurt, and so on. It can also noticeably reduce the amount of time spent milking, as it only has to be done once per day while still maintaining a high milk output.
For commercial dairies, calf sharing techniques are often not very practical, so the young are bottle fed, and the lactating mothers are machine milked twice per day.
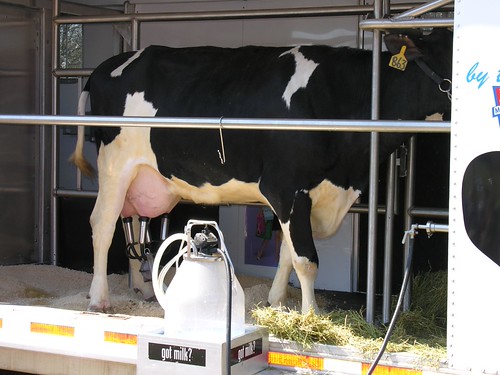
Milking occurs in a milking parlor, although that can take on many different forms, especially for a family with few dairy animals (it may be as simple as a head gate installed in a run-in shed). Typically the animal is led into a head gate with some feed it likes, the head gate closed, the farmer cleans the udder, and either hand-milks the animal with a bucket underneath or hooks up the teats of the udder to a milking machine until the process is complete. Most farmers will use teat-dip on the teats to help avoid mastitis while the teat orifices close up over the next 15 minutes or so and release the animal.
Note that milk should pass through a filter every time it is collected. Dedicated filters exist for many milking machines or milk buckets, and are usually single-use. Inevitably a tiny bit of hair or dirt will make its way towards the milk bucket or tank, and the filter will collect these and minimize the likelihood of contamination of the collected milk.
¶ Manual Milking
Manual milking (hand milking) is specifically done by curving the fingers, placing the teat in the curve of the fingers with the thumb at the base of the teat touching the udder. The thumb and index finger then squeeze the top of the teat by the udder strongly enough to keep milk from flowing from the teat back into the udder, and the fingers then all close around the teat from the top down to the bottom where the orifice is so the milk in the teat flows out. The grip is relaxed so milk can flow down from the udder back into the teat, and the process is repeated until the vast majority of the milk as exited that half or quarter of the udder.
Given two hands, two teats can be milked at a time. For cows, the front quarters should be milked first, and then the back quarters milked.
Kathy McCune at Family Farm Livestock gives a good overview of a full manual milking session here and in this video:
¶ Machine Milking
Machine milking can relieve some of the physical strain of manual milking, and theoretically can be faster. However, milking machine parts must be properly cleaned after each use in order to avoid contamination by pathogens, so often it is not much faster in practice, even if it is easier overall. Milking machines consist of several parts:
- Pump, to create the vacuum to suck the milk out, and associated regulator and gauges to control the strength of the vacuum
- Pulsator, to create a rhythmic and gentle on/off sucking pattern with the vacuum to mimic the action of how babies suck and how manual milking removes milk
- Collection receptacle, usually a bucket, jar, or tank
- Cups, with interior inflations, which are attached to the teats
- Tubes connecting vacuum up to the cups, and tubes connecting the milk outflow to the collection receptacle
It's important to have the right size of cups and inflations for the particular animal, and even within the same species there may be different sized teats. It's also important to use the right strength of vacuum and have a well-functioning pulsator, as too high a vacuum can cause damage to the animal, and too low a vacuum can make things take much longer or leave milk in the udder and lower milk production.
There are many machine milker systems available, but a few examples of milking systems for small dairies or families are, in no particular order:
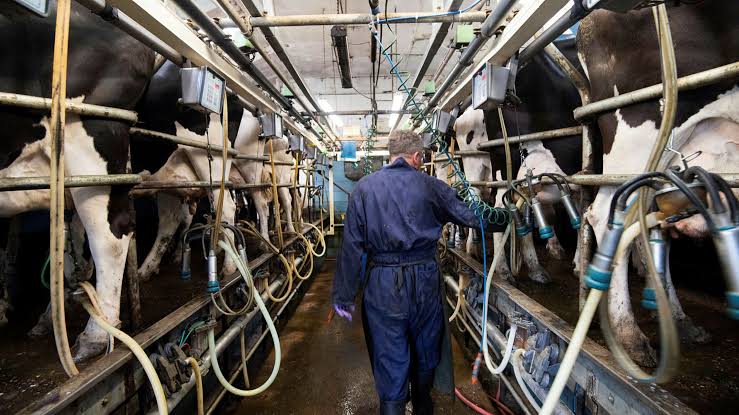
¶ Milking Pipelines
Milk pipelines are just larger-scale machine milking parlors, where instead of the milk flowing into a bucket, it flows into a larger milk holding tank where it is pooled with milk from other animals in the same milking session and cooled. It requires a larger vacuum, piping from all of the milking stalls to the holding tank, and generally these have a cleaning mechanism where the whole pipeline can be cleaned after milking, often fairly automatically.
¶ Storage
¶ Containers
Milk is best stored in a nonreactive container. If that is plastic, it should be HDPE or other food-grade versions. Aluminum and copper containers are not recommended, but stainless steel is a good choice. Glass is also a good choice, and is what most homesteaders use for milk storage. Most machine milkers deposit milk into a stainless steel or glass container, and have lids that are food-grade plastic, so the containers can be placed right into a refrigerator.
¶ Refrigeration
If milk is going to be turned into cheese right away, it can skip refrigeration and go directly into the cheese vat. Any other scenario requires the milk to be cooled to refrigerator temperatures (33-40 F) ideally within a couple of hours of collection. Dedicated milk tanks have built-in refrigeration and stirrers to agitate the milk and help it cool evenly to the right temperature, but it is important to monitor the process to ensure it happens properly.
Some milks can be frozen, such as ewe (sheep) milk, and still retain good texture. For animals that produce lower amounts of milk like sheep, this can be a good option to collect up a larger batch of milk over multiple days or even weeks, and then thaw all of it at once for a cheese making session.
¶ Keeping It Clean
¶ Cleanliness Standards
Please see further below for the USDA regulatory bacterial counts, and recommendations for how to evaluate whether the milk collection has been successful from a cleanliness standpoint.
There are essentially four main enemies to cleanliness in milk:
- Udder cleanliness and health
- Milking equipment cleanliness and sanitization
- Kinks, corners and uncleanable nooks and crannies in collection and storage equipment
- Refrigeration and cooling issues
It is standard practice before collecting milk to thoroughly clean udders and teats of dirt, manure, debris, and to wipe at least the teats down with some sort of sanitizer. Some also opt to strip the teats out a couple of times by hand of their first milk to flush any potentially bad bacteria that may have found their way past the teat orifice and into the teat canal. Once the teats and udder are visually clean, they can be manually milked or machine milked. After milking, it is common to use a teat dip (usually iodine-based) that rehydrates the skin to help avoid chapping and cracking, and to keep bad bacteria from finding their way into the teat canal in the minutes after milking because the orifice is relaxed and open for a while afterwards. Following this process keeps the milk clean, and minimizes the likelihood of the animal getting an udder infection (mastitis).
Milk collection equipment needs to be flushed of any milk or anything else with clean water, cleaned with a recommended soap or detergent (manufacturers will have recommendations for this), and finally sanitized. This should happen ideally right after any milk collection has completed. Sanitization could happen right before the next milk collection, but most sanitizers last for a little while if left on and so it may be able to happen right after milking and cleaning and then left.
Note that when flushing equipment, colder water should be used first, because if hot water is used right away then minerals from the milk will precipitate out and try to bond to surfaces and form what is called milk stone. Usually after a cold water rinse, warm or hot water can be used to help melt and flush any milk fat.
Everything must go through this process: milk pails, cups, inflations, tubes, valves, and so on, essentially everything the milk could touch on its way to the jar or the bottle or the tank. Pay particular attention to your equipment to make sure no tubes are kinked, no valves are difficult to clean properly, and so on. It's the difficult turns and corners in a milk pipeline that produce stagnant pools or eddies that allow milk to not fully flow along that can result in a pathogen taking up residence and surviving to reproduce enough to cause a problem.
Unless the milk is going directly into the cheese making vat (which you surely cleaned and sanitized as well), it needs to go into a clean and sanitized holding tank. These tanks should have the capability to cool the milk to refrigeration temperatures as quickly as possible. They usually have built-in agitators (stirrers) to keep the milk moving and evenly cooling, and it's important to get the milk to less than 40 F within a couple of hours or so of collection. Cooling issues are a notable cause of pathogenic outbreaks, so keep your cooling equipment inspected, and try to have it set up where you can monitor it or get notified if the temperature doesn't get to where it needs to be and stay there. USDA grade A milk rules require using approved tanks, temperature recorders and milk collection equipment in part to help ensure that these goals are all met consistently with every batch of milk.
¶ Additional Recommendations
In addition to the standard milk collection and cleanliness practices above, there are additional steps one can take to reduce the likelihood of milk contamination. Parasite loads and pathogens are reduced when ruminants are on good pasture and are rotated as often as possible, for example by following management intensive grazing principles. The animals are far less likely to be standing in, laying on their manure, and the pathogens have far less time to multiply before the animals have moved on to clean pasture. Making sure manure is spread out (by a manure spreader or by trailing poultry flocks behind the dairy animals to pick through and spread out the manure) helps lower pathogen loads, as well as increase UV exposure from the sun on the manure and pasture which is a natural sanitizer.
Pay special attention to the health of your dairy animals; find a reason to have someone observe them and be near them at least once a day if possible (again, management intensive grazing is a method that helps to encourage this type of habit), as health issues caught early will be much more solvable, and the likelihood of pathogen loads increasing will be reduced.
Clean holding pens, barns, stalls, trailers and so on as much as is feasible, and watch for problems in the winter when increased moisture turns areas into bogs, or animals congregate heavily around waterers, feeders, and shade areas. Distributing the animals' effects more evenly over their grazing, feeding, watering and loafing areas is a good goal to have, although practical constraints mean that in practice this will never be perfect.
¶ Typical Pathogen Contamination
There are only a handful of pathogenic bacteria that tend to get a foothold in milk and cheese.
- E. coli 0157:H7, the pathogenic strain. Can be very dangerous, even resulting in hospitalization or death if consumed in quantity.
- Campylobacter Jejuni. This is reasonably likely in dirty conditions to get a foothold in raw milk. This pathogen is a leading cause of “stomach flu” and food poisoning, is present in many raw foods, and is a common ailment for people who eat undercooked meat. It is very rarely fatal, but it can result in hospitalization due to dehydration.
- Salmonella. Not common in milk and cheese, but can occur.
- Listeria. Not common in milk and cheese, but can occur.
- Staphylococcus Aureus and Staphylococcus Enterotoxin. Not common in milk and cheese, but can occur.
¶ Botulism and Its Butyric Cousins
Note which pathogen is not listed: botulism (Clostridia Botulina). A clearly documented case of botulism from milk or cheese alone has not been forthcoming. A vector for botulism could be untoasted/non-dried herbs or spices added to cheese, so extra care should be taken when incorporating additional non-cheese ingredients into a cheese make.
Two cousins of the botulism pathogen do, however, make it into cheese pretty regularly: Clostridia Butyrica and Clostridia Tyrobutirica. Neither of these are pathogenic in a practical sense, but they are gas producers that cause late blowing of a cheese with horizontal fissures and irregular eyes / gas pockets inside the cheese body. They produce butyric acid, literally the vomit taste, so cheeses that suffer from late blowing are not palatable for human beings. They can be eaten by livestock and chickens, however, generally without issue (and will be, as they say, the most expensive chicken feed ever).
The clostridia family of bacteria are thermoduric, so when temperatures rise to pasteurization levels they will cocoon up into a toughened form and try to ride out the inhospitable conditions. Even pasteurized milk can thus easily carry clostridia spores, especially if the cows were eating silage or haylage that was not properly managed (which is common). When conditions become favorable again where temperatures drop and the acidity (pH) is not too harsh for them, they sporulate back into vegetative form and begin reproducing, hence the late blowing of the cheese as they ramp up their action after a week or so at cave temperatures in a cheese.
Clostridia bacteria can only be fully killed by elevating temperatures to 250 F or higher for several minutes. This is the process for UHT pasteurization of milk, which makes it shelf stable. This is also the reason that water-bath canning cannot be used for certain non-acidic foods. Boiling temperatures are not enough to kill clostridia (and thus botulism) spores, so if the pH inside the jar is not low enough, when the temperature goes back down the botulism bacteria will wreak havoc and lace the food with its deadly toxin. Pressure canning must be used in those cases to raise the temperature high enough to finally kill all clostridia spores to make it safe.
Taking temperatures that high is not an option for cheese, and using UHT milk is not an option because it will fail to form a curd, so other methods must be used to control clostridia spores: proper acidity, proper feed for the dairy animals, clean milk collection, and in Europe some small amounts of sodium nitrate and sodium nitrite can be added to the milk which is highly effective at stopping clostridia bacteria. In the USA, nitrates and nitrites are not approved as an additive to cheese, although the safety of using them has been well established in Europe, and it is used fairly regularly on washed-curd cheeses such as Gouda which have a higher pH and are otherwise susceptible to late blowing from the butyric bacteria.
¶ Evaluating Safety
¶ Bacterial Counts
To get definitive knowledge about the the safety of a given batch of milk, lab tests should be performed to determine the plate counts of various types of bacteria. There are 6 more or less standard lab tests that can be done on raw milk to get an idea of its safety. These are usually expressed as cfu/ml (colony-forming units per mililiter of milk):
- SPC (standard plate count), or total count of aerobic (oxygen-consuming) bacteria.
- PIC (preliminary incubation count), where the milk is brought to 55 F and then an SPC is performed. Bacteria that thrive at this temperature are generally psychotrophic which will still grow at refrigerator temperatures. They are generally not pathogenic, but they produce off tastes and degrade the quality of the milk.
- LPC (laboratory pasteurization count), where the milk is pasteurized using LTLT (low-temperature, long-time) pasteurization, held at 145 F for 30 minutes, and then an SPC is performed. Surviving bacteria in this test are thermoduric, of which the clostridia family are a part, which can cause late blowing in cheese.
- Coliform count. This checks for the presence of any coliforms, of which the pathogenic version of E. coli is a member. Most coliforms are not pathogenic, even most E. coli bacteria are not except a specific strain, but coliforms can cause early blowing in cheese and should all be treated as a hard stop if the milk is contaminated with them.
- SCC (somatic cell count), an indicator of white blood cells and other animal cells. This can indicate mastitis (udder infections) or other udder health issues. These levels can be elevated at certain stages of animal lactation. Also, some ruminants (e.g. goats) shed cells into the milk as part of how they produce it, so they tend to have much higher SCCs naturally and it's not a problem. For cows and sheep lower counts are ideal.
- MUN (milk urea nitrogen), an indicator of the amount of extra protein. If levels are high, it can affect cheese produced with the milk, but it more indicates waste and high ammonia production in their urine.
Here are the limits and goals for each test, given per ml of milk (courtesy of Dairy Practices Council and Gianaclis Caldwell). They are for raw milk, unless stated otherwise.
| Lab Test | Goal | Passable | Industry Standard | USDA Grade-A Regulatory Limit |
| SPC | Less than 1,000 | Less than 5,000 | Less than 10,000 | Less than 100,000 per producer Less than 300,000 per comingled tanker |
| PIC | Less than 3-4x the SPC | Less than 25,000 | 25,000-50,000 | (no limit) |
| LPC (pasteurized) | Less than 250-300 | Less than 250-300 | Less than 20,000 | Less than 20,000 |
| Coliform | Less than 10 in raw milk | Less than 50-100 in raw milk | Less than 10 in pasteurized milk | Less than 10 in pasteurized milk |
| SCC (not goats) | Less than 200,000 | Less than 750,000 | ||
| SCC (goats) | Less than 1,000,000 | |||
| MUN (cows) (N/A yet for goats/sheep) |
10-14 mg/dl | (no limit) |
Additional lab tests may be performed for the following pathogens to establish their presence (if isolated) with certainty:
- Salmonella, while there is no regulatory limit, ideally this count should be zero.
- Listeria, while there is no regulatory limit, ideally this count should be zero.
- Campylobacter Jeijuni, while there is no regulatory limit, ideally this count should be zero.
- E. coli 0157:H7 (the pathogenic strain of E. coli), this ideally should be less than 10 cfu/ml, definitely under 100 cfu/ml, but for raw milk intended for pasteurization there is no regulatory limit (it is assumed that the E. coli will be killed during pasteurization, yielding it back to less than 10 cfu/ml).
- Staphylococcus Aureus, , this ideally should be less than 10 cfu/ml, definitely under 100 cfu/ml, but for raw milk intended for pasteurization there is no regulatory limit (it is assumed that the E. coli will be killed during pasteurization, yielding it back to less than 10 cfu/ml).
- Staphylococcus Enterotoxin, while there is no regulatory limit, ideally this count should be zero.
¶ Mastitis
For mastitis tests, please see the article on livestock diseases.
¶ Potential Causes of Failed Tests
High counts in raw milk are often indicative of particular cleanliness or sanitation issues, or conditions in which the dairy animals live or the feed they eat. The following table (courtesy of Richard Wallace of the University of Illinois Extension, and Gianaclis Caldwell) indicates where you should start looking if a count is higher than desired:
| Lab Test Count | Naturally Present | Mastitis | Udder Dirty | Equipment Dirty | Cooling Problem |
| SPC greater than 10,000 | Unlikely | Possible | Possible | Possible | Possible |
| SPC greater than 100,000 | Unlikely | Possible | Unlikely | Likely | Likely |
| LPC greater than 300 | Unlikely | Unlikely | Possible | Likely | Unlikely |
| PIC greater than 3-4x SPC | Unlikely | Unlikely | Possible | Likely | Likely |
| SPC greater than PIC | Unlikely | Assumed | Unlikely | Unlikely | Unlikely |
| Coliform greater than 100 | Unlikely | Possible | Possible | Possible | Unlikely |
There are other vectors of contamination and cleanliness issues. In the next section, there are visual tests provided which will talk about potential issues with animal feed as well which should be considered.
¶ Visual Milk Tests
An excellent guide for being able to visually see the quality of your milk are to perform the tests recommended by Peter Dixon of Dairy Foods Consulting. His website as of this writing is offline, but this guide is reproduced here. It covers two major sources of contamination, their vectors, and how to evaluate the milk to know if it is clean and good for cheese making.